Minnidip Balloon Garland: How to Style & Install Like a Pro
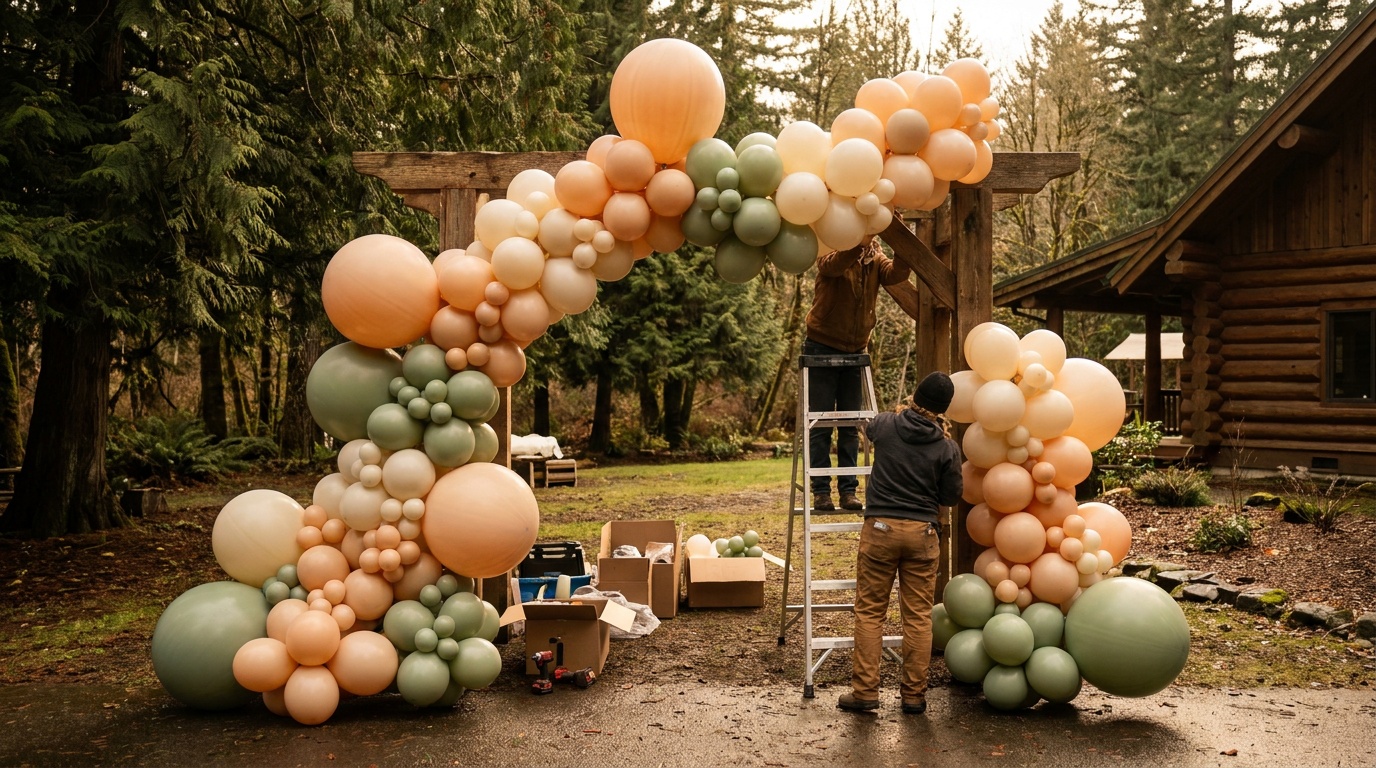
A minnidip balloon garland isn't just a smaller version of the big balloon garlands you've seen at other events. It's a completely different animal—one that requires understanding density, weight distribution, and the specific behavior of tiny balloons under pressure. We've installed hundreds of these across Kent, Renton, Auburn, and the surrounding areas, and here's what we've learned from doing it in real conditions, on real walls and arches, in real weather.
What Makes a Minnidip Balloon Garland Different
The minnidip style uses balloons in the 5-to-11-inch range—some people call them "mini balloons"—packed so densely that you barely see the base string. It's the opposite of the loose, airy look you get with 24-inch latex balloons.
The result? A lush, romantic, almost cloud-like appearance. It photographs like nothing else. The light catches all those curved surfaces and bounces differently than it does on a standard 18-inch balloon. Walk into a room where someone's installed a minnidip garland for a wedding, and your first instinct is to reach out and touch it—it looks that plush.
But here's what nobody tells you when you're ordering one online or watching YouTube tutorials: those tiny balloons are harder to work with than larger ones, they deflate faster, and they weigh way more per linear foot than people expect.
Why Density Matters (And Why We Don't Cut Corners)
In our experience, the difference between a minnidip garland that looks stunning at hour two and one that's visibly deflating by hour six comes down to one thing: inflation pressure and balloon count.
Each mini balloon needs to be inflated to the right firmness—not rock hard, but definitely not soft. Underinflate them and they start looking wimpy within two hours. Overinflate them and they pop when you're tying them off. We've learned this the hard way, especially during August events in Tukwila when we're working outside and the heat makes every balloon touchy.
The garlands we build use 18 to 22 balloons per linear foot. That's roughly double what you see on cheaper pre-made garlands. It's also why professional installation costs what it does—you're not just paying for the balloons, you're paying for the time it takes to tie off, space, and secure that many individual pieces.
When we install a minnidip garland for a wedding in Renton or a birthday celebration in downtown Kent, we're building something with real structural integrity. Not something that's going to start looking thin and droopy halfway through the cake cutting.
Installation: The Real Process
If you're thinking about doing this yourself, here's exactly what's involved.
Setup time: Budget 2.5 to 3 hours for a 10-foot garland. That's not inflating—that's assembly only, assuming the balloons are already blown up.
Tools you absolutely need:
- Fishing line (we use 30-pound test—heavier line shows less)
- Small sharp scissors (kitchen shears will fray the line and drive you crazy)
- A balloon pump (hand-pumping 200+ balloons is not happening)
- Clear tape and painter's tape
- Ladder or step stool
The assembly process: Start with your base string—we use a sturdy nylon cord, never flimsy twine. Tie off one end to a stable point. Then, for each cluster, you're tying 4 to 5 mini balloons around the base using fishing line, rotating them so they face different directions. Once you've got 4-5 clusters, you start spacing them along the base line, using fishing line to secure them.
The key skill—and this is where experience matters—is understanding how tightly to pack each cluster without causing balloons to deform. Pack them too tight and they flatten where they touch. Leave them too loose and the garland looks skinny.
We've installed these in wind, humidity, and direct sun along the 167 corridor between Renton and Auburn. Wind is the enemy. Even a 10-mph breeze will shift those light mini balloons and throw off your spacing. That's why professional installers do it as close to event time as possible and use extra anchor points.
Real-World Scenarios We've Handled
Outdoor wedding in Federal Way, June event: Client wanted a 15-foot minnidip garland as the ceremony arch backdrop. Temperature that day hit 82 degrees by noon. We used helium-free balloons (better for outdoor durability), inflated to the right firmness, and installed at 4pm for a 6pm ceremony. Result: looked perfect at 6pm, started showing minor deflation by 7:30pm. We'd warned them about this and had a backup section ready—swapped it out in ten minutes.
Indoor sweet 16 in Burien, June event: Climate-controlled banquet room, 8-foot entry garland. Temperature and humidity stayed stable. That garland looked exactly the same at 10pm as it did at 6pm. Client got six full hours of photography without a single deflated balloon. This is the ideal scenario for a minnidip—indoors, climate-controlled, shorter duration.
DIY attempt we saw in Auburn: Client bought a pre-made garland from an online supplier, tried to install it themselves. By hour three, they had visibly thin spots and one cluster that had completely separated from the base line. The issue: they didn't understand that you can't just hang a pre-made garland and expect it to hold. It needs ongoing adjustment and monitoring, especially if it's been compressed in shipping.
Styling: Where to Use Minnidip Garlands
Minnidip works best in spaces where your guests will spend time looking at it up close. Long rectangular tables, entryway walls, ceremony arches, dessert displays. It's fantastic for wedding balloon decorations because the intimacy of the style matches the tone of the event.
We've seen it used beautifully for wedding balloon decorations in Renton and Kent celebrations, where the couple wants something more refined than a traditional balloon arch. It also works for bridal showers, baby showers, and milestone birthdays.
What it doesn't work for: outdoor all-day events, spaces with heavy foot traffic where people brush against the garland constantly, or venues with inconsistent temperature control.
The Cost Reality
A professionally installed minnidip balloon garland runs between 200 and 350 dollars for a 10-foot section, depending on color complexity and installation difficulty. If you're comparing that to a standard balloon garland at 120-180 dollars, the difference is real. But you're not paying for extra balloons just to pad the invoice—you're paying for density, durability, and a polished final product.
The math: a 10-foot minnidip garland uses roughly 200-220 balloons. A standard garland uses about 100. Mini balloons cost slightly less per unit, but the labor to assemble them is where the real cost sits.
How We Do It at Balloon Decor NW
We prep our mini balloons in batches using electric pumps calibrated to deliver consistent inflation pressure. We test the firmness of each balloon before assembly—this sounds obsessive, but it's the reason our garlands stay looking sharp all day.
We use monofilament fishing line that we've tested in our specific climate conditions. We pre-assemble clusters in a temperature-controlled space and transport them to your venue for final installation. This reduces on-site assembly time and gives us more control over quality.
Most importantly, we time the installation to happen as close to your event start time as possible. For a 6pm wedding, we're installing at 4:30pm or 5pm—not the day before, not three hours early. Those 30 to 60 minutes matter more than people realize.
Pro Tips If You're Installing Yourself
- Inflate your balloons the morning of your event, not the day before. Even indoors, they'll lose about 5 percent of their firmness overnight.
- Use painter's tape to mark where each cluster should anchor. Measure twice, install once.
- Have fishing line scissors—not kitchen scissors—and have them sharp. Dull scissors fray the line and make tight knots impossible.
- If you're doing this outdoors, do it in the shade and wait until late afternoon when it's cooler.
- Test your anchor points before you start. A 10-foot minnidip garland with a full load of balloons weighs 25-35 pounds. That wall or arch needs to hold it.
When to Call a Professional
A professional balloon installation service handles the heavy lifting—literally and logistically. We show up with everything pre-assembled, we deal with any issues on-site, and we can make adjustments in real time if the venue conditions are different than expected.
More than that, we're insured. If a garland fails during your event, we fix it or replace it. We carry the risk. You get to focus on your celebration.
For events in Kent, Renton, Auburn, Federal Way, Tukwila, or Burien—especially weddings or milestone celebrations where the balloon décor is central to the aesthetic—it's worth the investment.
FAQ
What exactly is a minnidip balloon garland? A minnidip balloon garland is a pre-made garland featuring tiny balloons clustered densely around a base strand. The 'mini' balloons—usually 5 to 11 inches—create a softer, more romantic look than traditional larger balloon clusters. They're popular for weddings, bridal showers, and intimate celebrations because they photograph beautifully and work in tighter spaces.
Can I install a minnidip balloon garland myself? You can, but it requires patience and the right tools. The balloons are tightly packed, so you'll need fishing line, scissors, and about 2-3 hours per 6-foot section. We've seen plenty of DIY attempts in Renton and Auburn—some work out, but professional installation ensures clean lines, proper weight distribution, and zero drooping by hour four of your event.
How long does a minnidip balloon garland last? In our experience, indoor minnidip garlands stay looking crisp for 8-12 hours. Outside in Federal Way or Auburn? Plan for 4-6 hours, especially in direct sun or wind. Heat causes mini balloons to deflate faster than larger ones because they have less internal air volume relative to surface area. If your event is longer, we recommend having us swap out sections mid-event.
What's the price difference between a minnidip garland and a standard balloon garland? Minnidip garlands typically cost 20-30 percent more because they require more individual balloons and tighter assembly. A 10-foot standard garland might run 150-200 dollars, while the same length in minnidip style runs closer to 200-275 dollars. The price reflects the labor and the visual impact—they really do look more refined in photos.
The minnidip balloon garland is one of those design elements that looks effortless but absolutely isn't. It's built on a foundation of understanding balloon behavior, density requirements, and proper installation technique. Do it right and you've got something that transforms a space. Cut corners and you'll be apologizing to your guests by hour three.
If you're planning a celebration in the South King County area and you want a minnidip garland that actually holds up for your entire event, get in touch with Balloon Decor NW.